RabbitMQ Implementation for Microservices Communication on Node.js

When a monolithic system is no longer able to handle a large enough number of requests per second on the back-end, optimization is needed. Starting from implementing a load balancer, caching, code optimization, to migrating to a microservices type system. This time, I will try to implement RabbitMQ to be used as a communication method between services in a microservices architecture.
What is RabbitMQ?
RabbitMQ is an open-source message broker that we can use for communication in distributed systems such as microservices. RabbitMQ is quite light and can be installed on various operating systems easily. RabbitMQ also acts as a queue, which will serve requests from the first in or what can be called FIFO (First In First Out).
Why use RabbitMQ as a communication medium? Why not just use HTTP?
When one of the services fails, the HTTP pattern will stop working. And also after restarting, there is no way to track previous HTTP requests, so it can make the failure rate on a system quite high. Therefore, we need RabbitMQ, which will help us to scale up the system at a high level by adding a failure mechanism.
RPC Pattern
To use RabbitMQ itself, we will use the RPC pattern, which according to the RabbitMQ website guide itself is an implementation of the Request-Reply pattern.

When implementing the RPC pattern, we need to first open a reply channel, so that we can know the results of the response from the destination service when our message has finished sending and being processed by the destination service. We also need to mark the messages sent with what is called a correlation ID, which will be the sign we will use when taking replies from a reply channel where there may be more than one message. When we iterate over the list of messages obtained and it turns out that the messages have a different correlation ID, we can safely discard the message because it will enter the re-queueing state and continue the iteration to the next message.
Implementation
Just move on to the implementation stage, at this stage we will create a simple blog API project, where there will be several blog posts. However, the service for retrieving data on blogs is separate from the service that is only devoted to serving HTTP requests.
First we need to set up 2 new Node.js projects. The first one we will use as a service that can be hit using HTTP where Express.js and amqplib will be installed. Then the second one only works within the scope of blog posts where amqplib is installed. In this discussion, I did not use a connection to the database but only saved it in a file.

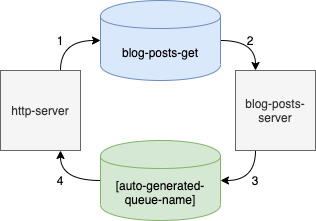
In the picture above, we will provide 1 queue for consuming and 1 queue that will be used to listen to replies.
Preparation
Before starting, make sure you have installed:
- Erlang (for running RabbitMQ)
- RabbitMQ
- Node.js
If so, first we prepare a project with the following structure:
.
├── blog-posts-server
│   └── app.js
└── http-server
    └── app.js
Then, go to each project folder and do npm init. Also install the dependencies required by the project.cd blog-posts-server
npm init
npm i
npm i amqplibcd http-server
npm init
npm i
npm i amqplib express
Implementation of Blog Posts Server
The following is the implementation of the script on the blog-posts-server which is tasked with providing blog posts based on ID. The functions in this service cannot be accessed directly by the user, but can only be called via the RabbitMQ queue.
Code explanation:
- Before listening to a specific queue, we need to initiate a RabbitMQ connection and channel first via lines 20–21.
- Then we perform an assertion on the queue with the name
blog-posts-geton line 23. What is done in theassertQueuefunction is to check whether the queue with that name and the options passed already exist or not. If it doesn't exist yet, then this function will create a queue. However, if it exists but does not match the options given, the function can throw an exception. - We also determine the prefetch value on the channel, where this prefetch means the maximum number of messages pulled from the queue. For maximum reliability, the value is usually set to 1. (line 24).
- On line 26, we consume the
blog-posts-getqueue by entering the callback function as one of the parameters. - When we get the result on line 29, we need to send the result to the callback queue which will be different for each incoming message. The messages sent also need to be converted into JSON and then converted again into Buffer.
- On line 34, when we feel that the message has been completely processed and is no longer needed, we acknowledge it so that the message does not go back into the queue when the callback function has finished executing.
HTTP Server Implementation
The following is a script implementation on the http-server that can be fired directly by the user. Blog data is not stored in this service because it is a different domain, but is stored in the blog-posts-server service.
Code explanation:
- RabbitMQ connections and channels are initiated at the beginning on lines 11–14, so they can be re-used during runtime.
- When getting a request for a URL with the
blog/:idpattern, initiate the callback queue first on line 21. We leave the first parameter as an empty string so that RabbitMQ will automatically generate a random string for the name of this temporary callback queue. - On line 23, we create a random ID to be used as a correlation ID to mark each message reply that will come in later.
- On line 29, we consume the callback queue. This needs to be done before sending the message because the process could be completed more quickly if the request is sent first.
- On line 41, we send a message to the
blog-posts-getqueue with the ID parameter which is converted into a buffer. - On line 31, we check the correlation ID obtained from the message to see whether it matches what we sent previously.
- After processing is complete, on lines 36 and 37, we cancel the consumer and delete the temporary queue that we created previously.
Running
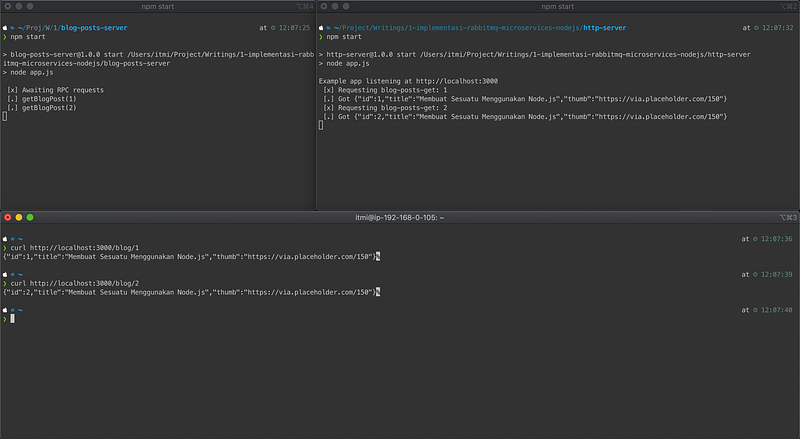
After finishing coding on both projects, we can immediately run it with node app.js on each project. But here I added the shortcut to the package.json start script.

Conclusion
Using a message broker for communication between microservices can overcome the failure problem that occurs from using HTTP alone. However, code optimization needs to be done again so that its implementation can be more optimal.
That's my first post, if there are any wrong words, I'm sorry. Or if you find that the method I share is still not efficient, corrections and input would be greatly appreciated. 😄
Reference:


